November, 1912, page 8
By Lillius
Hilt

First, let us have a little general talk about
Irish crochet. It is not among the older
laces, and perhaps you will like to know that its inventor or originator was a
French lady, mademoiselle Riego de la Blanchardiere. She discovered that a certain kind of old
Spanish needlepoint lace could be copied in crochet most effectively, and near
the middle of the last century she printed instructions for several patterns. At the time of the great potato-famine in
Ireland, and following this, her little booklet was used by many ladies of
quality for teaching the work to the peasantry and to cottagers, in order to
enable the poorer people to earn something toward living. About forty years later she prepared a more
comprehensive work on the subject, spending upon it all her spare time for
several years. The books are all out of
print, unless classed among those to be found in the reference department of
the large public libraries, and the name of its originator is doubtless unknown
to the larger number of workers who delight in making Irish crochet; but the
art has developed wonderfully in the last fifteen years. No longer confined to certain parts of
Ireland as a domestic industry, it has spread to France, Austria, Germany and
other countries of Europe, where large numbers of people are engaged in
supplying the demand for it; in our own America, too, there are experts whose
work is not put to the blush by the most expensive imported products.
Rarely will two workers follow directions for a
motif and have the result exactly the same.
One, with the real artistic sense, will draw the padding-cord a little
more tightly, or allow it to be a trifle looser, and so change the entire
appearance of a spray or leaflet which, in the hands of another, equally
interested and painstaking, seems very ordinary – lacking the lifelike,
graceful curve that makes the first a genuine work of art. Indeed, the same worker does not always
reproduce a design without variation, especially if the motifs are of a
character in the shaping of which the cord plays a large part. With any change in the form of the motif, the
filling or background must also be changed, since the picot-chains or loops
must always lie flat and smooth between the sprays, leaflets or other forms. Explicit directions for the filling are
therefore never attempted save in a general way; even if it were possible to
give them, they must of necessity be so long and intricate that the attempt to
follow them would result in failure – or in the giving up of the work at the
outset. Simply remember that in Irish
crochet the figures or motifs are first made and basted securely to a
foundation. Suppose, for example, you
wish to make a Dutch collar. Have a
perfect-fitting pattern cut from cambric, and baste this on heavy, flexible
paper or enamel-cloth – something that will bend easily, but cannot be drawn up
or puckered. No allowance for the edging
need be made when preparing this foundation, as that is worked beyond; while
there are workers who direct that the edge be made and applied to the edge of
the foundation, the writer has not found this plan the better one.

A general principle which should be observed in
making all fillings is, to have the holes or spaces as uniform in size as
possible, even though they vary in shape.
Nothing so detracts from the appearance of your work as to see one part
filled closely and another with spaces nearly half as large again. The beginner will do well to lay her work
down occasionally to see whether the filling is progressing properly, neither
too tight nor too loose, and evenly proportioned. Often a treble or double treble may serve as
part of a chain, by being taken into a certain part; indeed, a great deal is
left to the worker’s discretion, and this very freedom is the chief fascination
of Irish crochet, once the art is even partially mastered.
Another thing about filling that puzzles a
beginner is “where to go next;” and coming thus to a standstill, it is the most
natural thing in the world to “fasten off” and start somewhere else. This should be avoided all that is
possible. When you don’t know what to do
next, do it! Remember you can pull out a
loop that is not what it should be, so pluck up heart of grace and “move on,”
and the trouble is very apt to disappear.
To avoid frequently breaking the thread, stems may be crossed with
slip-stitch or single crochet, or one may make a chain from point to point
where it will not show; this, however, should not be often done, since the
slip-stitch shows less.

Single crochet or slip-stitch: Having a stitch on the needle, insert hook in
work, thread over, and draw through work and stitch on needle at same
time. The true slip-stitch, it should be
added, although generally applied to single crochet, is a close joining stitch,
made thus: Drop the stitch on your
needle, insert hook in work at the place where you wish to join, pick up the
dropped stitch and pull through.
Double crochet:
Having a stitch on the needle, insert hook in work, take up thread and
draw through, making two stitches on needle, take up thread and draw through
both stitches.
Treble crochet:
Having a stitch on needle, thread over, insert hook in work, take up
thread and draw through, making three stitches on the needle; take up thread
and draw through two stitches, again and draw through two. Double treble, triple treble, quadruple
treble, and other long stitches, rarely used save the double treble, are made
the same as treble, putting thread over once, twice, three times, or as
required (twice for double treble, three times for triple treble, and so on),
inserting hook in work, drawing thread through, then working off the stitches
two at a time. Half treble is like
treble, save that thread is drawn through all three stitches at once, after
having drawn it through the work. The chain, which is the fundamental stitch of
all crochet-work, is simply a series of loops, each drawn through the one
preceding it.

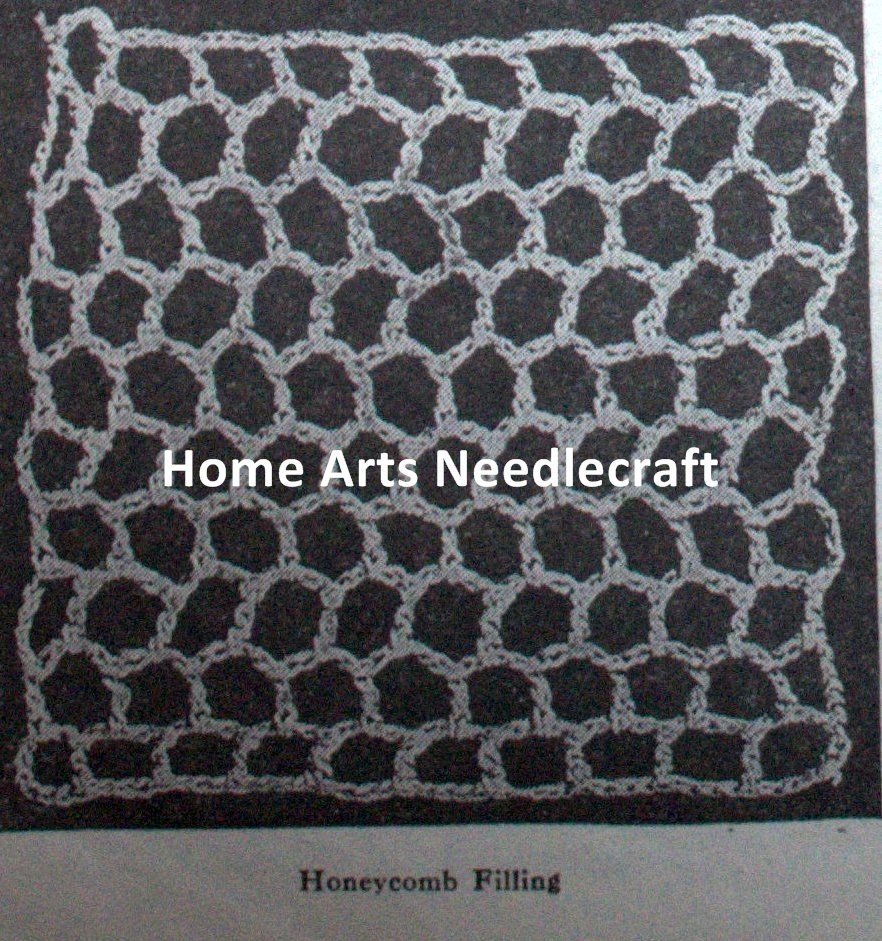
For the honeycomb filling, commence with a chain
of the required length.
1. Miss 9,
a treble in next stitch, * chain 4, a treble in 4th stitch; repeat
to the end, turn.
2. Chain 8,
a treble under 4 chain, * chain 4, a treble under next 4 chain, repeat from *,
turn.
Repeat the 2d row as required.
Single-picot filling: 1.
Having a chain of required length, or starting from a given point, chain
2, 1 picot of 6 chain, fastened back into first stitch), chain 5, fasten in 6th
stitch of foundation; repeat.
2. Chain 3,
(to turn), picot, chain 5, fasten under 5 chain of last row * chain 2, picot,
chain 5, fasten under next 5 chain; repeat to end, and repeat the row.
Double-picot filling: 1. Commencing as before directed, * chain 2,
picot (composed of 5 chain, caught back in 1st stitch of chain),
chain 4, picot, chain 2, fasten in 7th stitch of foundation; repeat.
2. Chain 2,
picot, (chain 4 picot) twice, this in turning – if using the ground in the
usual way, as a filling, the loops will be uniform – chain 2, fasten under 4
chain between 2 picots of last row, * chain 2, picot, chain 4, picot, chain 2,
fasten under next 4 chain, and repeat.
All rows are same as 2d.
Other fillings or grounds shall be given later –
the triangular, shamrock, and so on.
Those presented are worked out in heavy thread to be the more easily
followed, and they should be practiced until one can do them easily and well,
almost without thought. From them, by
adding little borders, one may fashion collars, cuffs, and other articles, or
handbags upon which to applique some pretty motif, and thus one’s labor will
not be lost while acquiring proficiency.
Bear in mind that all fillings must be adapted by the worker to the
particular shape of the space to be filled.
Often, as has been suggested, a treble or double treble is used after a
picot, so that one may start from the picot again without breaking the thread,
or slip-stitching up – all of which comes by intelligent practice. When the thread must be broken the end should
be fastened by a very tight chain-stitch and cut off carefully. The length of chains, and size of picots,
must be determined somewhat by the design and the quality of thread employed;
but by the design and the quality of thread employed; but the direction given
may be followed, as a rule.
Several simple but very attractive motifs are also
given – just as a beginning; and these, too, are worked out in heavy material. Singly or in combination, they may be used in
making a variety of articles.
Picot-wheel:
Chain 5, and join to form a ring.
1. Chain 4,
(a treble in ring, chain 1) 11 times, fasten in 3d of 4 chain.
2. Chain 1,
and over the cord (carrying it along close to the work) make 2 doubles in a
space and double in treble; repeat around, join.
3. Chain 1,
* make 2 trebles in 2 doubles of last row, working over the cord in back loop
of stitch, chain 4, a treble in same stitch with last treble; repeat from *
around, making a picot over each spoke of the wheel. If a smaller wheel is needed the last row may
be of doubles instead of trebles.
Triangle:
Chain 10, join.
1. Chain 3,
20 trebles in ring, join.
2. Make 5
doubles in 5 trebles, chain 10, miss 3 trebles, repeat twice, joining last 10
chain to 1st double, and making a three-sided form or triangle.
3. Make 5
doubles on 5 doubles, 18 trebles under chain; repeat, always working in back
loop to make a ridge. Join last treble
to 1st double.
4.
Slip-stitch over next double, chain 4, miss 1, a treble in next, chain
1, miss 1, 1 treble, then on the rounded edge make a treble in every stitch,
with 1 chain between; join last 1 chain in 3d of 4 chain.
Cloverleaf.
Commence with the stem, making 30 doubles over the cord. For the leaf, I single, 24 trebles and 1
single over cord, joining last stitch to 1st to close the leaf, and
drawing the cord to shape it nicely; repeat to form the 2d and 3d leaflets, and
for the center ring make 20 doubles over the cord, turning so as to have the
ring on wrong side. Now work a double in
each treble of leaflets, catching each together with a slip-stitch to make them
firm, and catch to the center ring in two places. Work back on the stem with doubles in
doubles, taking over the cord into back loop, and fasten off.
Spiral Medallion:
Over the cord work 27 doubles, pass the cord under to form a loop and
fasten in 12th stich from needle; then make 15 doubles over the
cord, and join to 1st stitch at beginning with a stich across the
two; repeat twice, making three lobes with a spiral at the outer end of
each. Work over the cord, making a
double in each stitch of previous row; and taking up the pack part to form a
ridge. Fasten off neatly and securely.
The Rose:
No collection of motifs would be complete without the rose, which is a
distinctive feature of Irish crochet, probably used more than any other. Chain 5, join.
1. Chain 6,
(a treble in ring, chain 3) 5 times, join to 3d of 6 chain.
2. Make 1
double, 3 trebles and 1 double in each space.
3. Chain 4,
fasten in top of treble between petals of last row; repeat around.
4. In each
space make 1 double, 5 trebles and 1 double.
5. Chain 5,
fasten between petals; repeat.
6. In each
space make 1 double, 6 trebles and 1 double.
7. Like 5th
row, with 7 chain instead of 5.
8. In each
space make 1 single, 1 double, 8 trebles, 1 double and 1 single.
This completes the rose. Surrounding it is the center-picot filling,
as follows: 1. Slip-stitch to 4th stitch of 1st
petal, chain 4, picot (as in single picot filling), chain 4, miss 3 stitches of
petal, fasten in next, chain 4, picot, chain 4, fasten in 4th stitch
of next petal, and repeat around. After
the last picot make a double treble in the stitch where the 1st loop
started.
2. Chain 4,
picot, chain 4, fasten at base of picot in last row; repeat.
And now, just as a bit of practise, we will have a
dainty medallion which will be exactly the thing for a shirtwaist inset,
jabot-ends, border, or any other purpose to which it can be adapted. For the pansy which forms the center, work 30
doubles over the cord and close in a ring, joining with slip-stitch: * over the
cord work 20 doubles, chain 1, turn, droop the cord, make 20 trebles in 20
doubles, working in both veins of the stitch, chain 1, turn, a treble in each
treble, slip-stitch down the side and draw the cord to curve the petal
slightly, miss 8 doubles of the ring, make a double over the cord, in each of
next 2, and repeat from * twice. Fasten
ends of cord neatly, and slip-stitch up to corner of 1st petal. The filling is the double picot, a little
more open than previously described; if the latter is used make 4 loops across
each petal instead of 3. (Chain 4, picot
of 6 chain, chain 4, picot, chain 4, miss 6 trebles, fasten) 3 times, chain 4,
picot, chain 4, picot, chain 4, fasten in 1st stitch of next shell,
and repeat. Next row, chain 5, picot,
chain 5, picot, chain 5, fastening each loop between picots of last row, and in
the next make each loop of chain 6, picot, chain 6, picot, chain 6. Straighten the edge with chains of 16
stitches, fastened between picots, making 18 chain to square each corner. Surround this row with a row of trebles, 2
chain between, and at each corner 2 trebles in one place with 6 chain
between. Finish with 2 doubles in a
space, double in treble, 2 doubles in next space, chain 6, for a picot, and
repeat. Under each corner chain make 4
doubles, picot, 4 doubles.
Once more, because it cannot be too often
reiterated, the stitches in Irish crochet must be firm, close and uniform, and
the padding must never show through. If
loose, uneven work is ever permissible, it is not so here. As to materials, any fine, well made steel
crochet-hook is suitable, but that with cork handle will be found especially
easy to work with, as it does not cramp the fingers nor become hot and moist as
a steel handle is apt to do. Round
meshes are needed for making rings of various sizes, but for these short
lengths of wooden or bone knitting-needles answer, or one who can handle a
pocket-knife can easily fashion from a bit of wood any size required. For large rings the tip of thumb or finger
affords an ever-ready makeshift, or the thread may be wound around two, three,
four or more matches, held together. A
paper of fine sewing-needles, assorted sizes should also be at hand, with a
pair of small, sharp scissors.
A receptacle should be provided for the work – a
covered pasteboard box or a basket of medium size, lined and with pockets
around the sides, serving well. A strap
across the inside of cover will hold the crochet-needles, meshes, scissors,
etc., while in the pockets may be kept the needles, cord, thimble, and the
different sprays as they are completed, the center holding the work and thread.
No comments:
Post a Comment